New Gas tank Top side 2

I purchased a used gas tank a few years ago. It looked solid, however having it flushed and cleaned revealed some pretty thin areas. And with re sealing with chemicals etc, it made me ponder just replacing with a new one. So I did. Found it in ebay, and for a pretty good price. So if you have a ’57-’59 Ford/Edsel Wagon or a ’57-59′ Ranchero you should purchase a new tank. They were a limited production run, so once they are out, I doubt they will make another run of them!

58wagongastank

The ebay seller is tomsclassic . He has them about $150 cheaper than everyone else. It’s a beautiful tank and liked it so much, I purchased one for my ’66 Fairlane GTA Convertible.

OldHousePhoto

Hello all, Yes. It’s been awhile. Just wanted to update you all on the Ranchwagon project. Nothing has changed. I haven’t done anything with it in over 3 years. I’ve been involved in a major home renovation, starting with a complete Foundation under my 120 year old home! It’s been a back and forth struggle to get the house up to snuff. If you’ve ever seen the movie Money Pit, then you’ll know what my wife and I are dealing with. If you think restoring a car can drive you nuts, try doing it to a house, with a wife, and pets while you are all still living in it.

Then in the midst of the house renovation , my wife and I were blessed to find out we were going to have a baby! He’s a healthy 10 week old now. He truly is a gift from God. But that’s another story.

So the car sits. Waiting for life to calm down a bit. But I’ll be back to it this summer and hopefully get to putting floor pans and inner and outer rockers installed. That should be a hoot.

Hibernation

Posted: January 17, 2013 in Uncategorized

It’s Winter.  That’s all I can give as an excuse as to why I haven’t done any work on the Ranch Wagon since November. It’s rainy, wet, cold, and dark.  All these added up to a sum of me being inside, working on other projects. I did manage to get the car cover off of the wagon on a cold, clear day.  I wanted to let it air out a bit and check to see if any water had gotten in.

January 06, 2013

It was mostly dry. The sun wasn’t putting off much heat, but I soaked up some water that had puddled in the engine compartment and put the car cover back on in the evening.  I have been working on cleaning up the transmission cross member brace.  I won’t be paining it anytime soon, as the temperatures prohibit it.  I’ll post some pictures later of some of the progress I’ve made on some of the inside projects I’ve done where it’s warm and dry.

I must confess, when I started this front end rebuild in August, I really didn’t think I would get it done by the September 15th deadline.  I thought for sure I would eventually run into an insurmountable obstacle. But no such roadblock occurred. I must ALSO confess, I didn’t meet the deadline. Saturday the 15th brought duties that my household and family needed me for. I postponed my car stuff gladly and happily. My brother and his family came by Saturday,and I enjoyed their company, and for my brother helping me unload a ton of wood pellets I had picked up that morning.  He was impressed with the progress I had made on the Ranch Wagon, and offered to help me finish it up on Sunday afternoon.  I took him up on the offer.


We got the brake drums ready to be installed by gathering up the new wheel bearing grease, and a lot of rags. Packed the bearings, tightened the nuts down and slipped the cotter pins in. Then we got the tires put on. I was essentially done. However, since I had my brother here to help me, I asked him if he wanted to take a ride to pick up the front clip I had stored over at Bob’s house. “Sure, sounds fun” he said. So on the road we went to get the ’58 Fairlane front clip I had removed from the parts car Bob and I had cut up almost a year ago. (Link to that adventure HERE)

Bob was helpful as ever, helping us load it into the back of my truck, strapping it down, and loading my truck with the other bits and pieces I had stashed away from the parts car behind his Shop.  We were back on the road and ready to get home to get installed back on the car.

We got all our body bolts ready to install, we got the new doghouse/front clip lifted up, and into place.  My 3 nephews ( ages 4, 6 & 7) were in awe of their dad and uncles ability to lift the whole front of a car into the air! They came running at us while he had the front clip in the air, and an attentive Aunt and Mother quickly moved in to keep their awe and amazement at a safe distance.  We got it bolted on, did some shimming and adjustments for the doors to open, and tightened it all down.  We were greeted with a Hero’s welcome from the boys who had witnessed what they thought was the coolest thing ever. We stopped there, as we were also suppose to be Barbequing their lunch!


After the kids and family were fed, they decided to take a walk to the city park, which left us guys there to finish bolting it all together. We put the grille and front bumper on, bolted the hood on, and decided we were finished. So, I got the front end done, & as an extra bonus, retrieved the front clip and got it installed.

The stance with the lowered springs looks great. I can’t wait to get the floor boards & rust repair done. I also want to get the 351 Windsor & C4 combo installed.  I can honestly say, this is the most satisfying auto project I have done in a long time.  I haven’t decided what my next goal & deadline are. But I’m sure I will enjoy it as much as the front end rebuild I just accomplished.

I started prepping and assembling the front end at around 9:30 am, and 2 Napa Auto Parts, 1 AutoZone, 5 Diet Cokes, 2 Metal splinters, 1/4 tank of gas, 2 Arby Roast Beefs, 38 miles  and 7 hours later, I am almost done!


I really ran into a problem with hardware. I didn’t have any new castle nuts for the upper ball joints to bolt to the spindle. The lower ball joints had hardware. Also, I needed castle nuts for the tie rod ends because I didn’t want to reuse the old ones. I also needed cotter pins.  A quick trip to the local auto parts store should end that need, right?

WRONG.

The first local NAPA Auto parts store got me this reply: “I don’t carry Castle nuts, but I do have cotter pins.”

Okay. So I bought cotter pins.

A 14 mile drive into the next city with an AutoZone  store brought me Castle nuts, but in metric only. GRRRRRR.

So I traveled across town to a NAPA Auto parts that did have Standard Castle nuts.  Of course, by then it was Lunchtime so a quick detour into the Arby’s drive thru and I was on the road home.

All I have left to do tomorrow is finish painting the brake drums, and get the wheels on and it’ll be landing time.  Wheels on the ground and goal achieved.  My shoulders ache from holding the spindles up, and working the jack to compress the spring from under the lower control arm. My wife already has the Icy Hot on the nightstand ready for a long back rub rehabilitation of this sore Ranch Wagon owner. But it was worth it.


Progress from August 4th to September 14.

The Boxes of parts have been flooding in this week! Coil Springs, wheel cylinders, Brake Shoes, Spring Kits,star wheel adjusters  & Brake hoses are all here.

I sandblasted the backing plates & spindles and coated them with Eastwood’s Rust Capsulator. After a 24 hour drying period, I then sprayed them with Eastwood’s Chassis Black Gloss early this morning before work,  which gave them a mirror like finish.  It got to 90 degrees here today, so the heat was good for baking that paint on real nice by the time I got home.


I then began assembling everything by attaching the backing plates to the spindles. Followed by the wheel cylinders, Brake shoes, star wheel adjusters, brake adjuster spring, and finally the return springs.  I had an expensive set of brake  spring removal/installation tool. It actually was such a pain in the butt to use,  I went back to my trusty old $3.00 spring tool I bought 20 years ago when I worked on my old Datsun pickup. It was so easy, and fast. I think I’ll give my brother the expensive/complicated brake tool. One less contraption to have to store.

One problem I did come across is that the brake shoes I ordered were about 1/2 in too wide. I actually think they sent me rear shoes. The ’58 wagons have wider brake shoes for the back, and the drums are wider also. This is unfortunate, as I don’t have time to send them back and exchange them for new ones.


Oh well. Now I have a set of rear shoes.  I inspected the old shoes, and they looked fine. The pad surface was very thick, not cracked, and looks like they had been replaced before it was parked in the late 1980’s.  I will purchase new pads at another time, but for the meanwhile these will suffice for driving it in and out of the garage.

Arms Back On The Frame

Posted: September 9, 2012 in Uncategorized

One week left until the self imposed deadline of having the Front suspension rebuilt, back together, and have the wheels on the ground by September 15th. The mad scramble to finish up small things to get it all put back together seems to take forever. The little things you forget about, like hardware, Cleaning up the alignment shims, Brake hardware,  etc are eating up time like crazy. I took the lower control arms to a small machine shop here in town to have the NOS lower control arm bushings pressed in. I dropped them off, and they said they would have them done by noon. So I went back to work bolting the upper ball joints into the upper control arms.  After that, I greased the control arm shafts, the thread in nut bushings, replaced the O’rings with new ones, and installed them on the arms as well.  I went back and picked up the lower arms, and got them prepped to install.  I started with installing the NOS lower control arm shaft pins into the frame.

Then I put the lower control arms in place and carefully finished driving the pins through the frame and into the newly installed bushings on the lower control arms. Once in, I tightened the nut and special washers in the ends. I then installed the upper control arms by bolting them in place, and placing the alignment shims in the exact place and number order they were in before I took them off. I know the car will have to be realigned later, but by placing the same shims in the same place is close enough for having the car roll around in a straight line for now.


I have them all bolted in, and will wait to torque them down until I have the spindles ready to install. The spindles and backing plates are soaking in the cleaning tank until Monday, when I will glass bead blast them.  I then plan to paint them with a couple of coats of Eastwood Chassis Gloss Black.

It’s a mad scramble to the finish, but I think I’ll meet the deadline!


I got the call this afternoon to swing by and pick up my upper control arms from the powder coater. I am sure glad I went this route, as you can’t beat the finish. It’s hard as a rock, and the gloss on them looks great. Now all I am waiting on are coil springs, and I’ll be bolting the front end back together with all new ball joints, bushings, & Hardware.


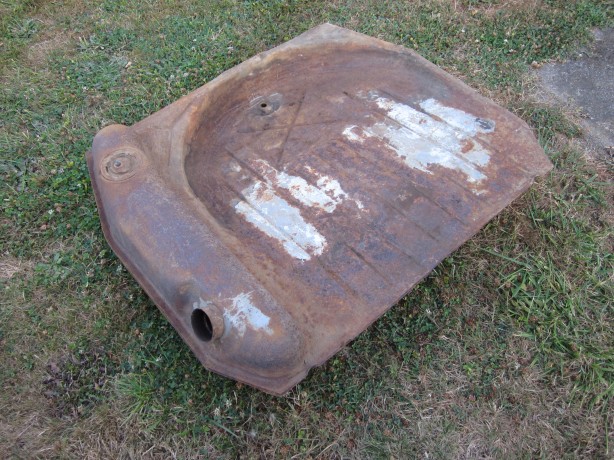
While laying under the wagon disconnecting the tabs that hold the fuel/brake lines to the frame, I decided to poke the body brace with a screwdriver to see how solid it was. The screw driver went through the brace and through the inner rocker.  I kind of just starred at it in disbelief. I pulled the screwdriver out and started poking further which opened up more daylight gaping holes. I started poking more and more holes in the brace where the body mount bolt goes through. It was really bad. I poked further up the brace toward the tranny tunnel area and…. No problems. Solid as a rock.  This little discovery was unexpected and unwanted.  So I went all around the car poking all the floor bracing. All were solid.  So I guess Just one of my brace ends needed to be replaced.  I can pinpoint this particular area being a problem, because the car sat outside for a long time with no door glass in the Driver side door. The rocker,  door bottom, and now this particular floor brace are all rusty in the same area. With the door shut the rust all lines up. This is the worst spot in the whole car.

New floor braces ends are available new. There are 4 different braces that run from driver to passenger side that go from the front to back. The particular brace end I need is the second from the front. The price for one of these braces range from $125 to $175 dollars each.  That is as much as a whole floor pan new!  So I went to plan B: Find a good used one.

This leads to this story. I made a new car friend named Dave a couple of months back that also has a recently acquired ’58 Ford 2 door wagon.  He was advertising that he was looking for some ’58 wagon parts, and I answered the ad. ( I had lots of wagon parts from the first wagon I started out with but eventually parted out)  He looked through my boxes of extra parts and picked out a few items he needed. We settled on price, however when loading the parts, one of them, the front valance wouldn’t fit into his car. I offered to deliver it the next day as he only lives 15 miles away. So when I get to his home to deliver the part, he shows me his collection of cars. Dave is into ’58 & “59 Edsels, and has many project Edsels and Rancheros in various stages of restoration. I am amazed at how many solid cars he has. He also buys Edsels and parts them out for his own parts shelves, and also to sell parts to other enthusiasts.  He recently acquired a ’58 Edsel 4 door from dry southern Oregon.  He had taken the front clip off, the dash, the teletouch steering wheel/push button trans column, and misc trim.  After he stripped it, his plan was to fill it with scrap metal and take it to the scrap yard. Dave schooled me on the Edsel line of cars. There are 2 kinds of Edsel. The 2 lower end body styles are based on the Ford platform. The floor pans and frame are the same as the ’58 Ford Fairlanes/Custom 300’s. The two upper end Edsel body styles are based on the ’58 Mercury platform/Frames which are not compatible with the Ford Line of Floor pans/frames. I never knew this and was amazed at how much Edsel knowledge Dave has acquired over the years.  I enjoyed the tour, and after showing me his newly acquired ’58 Ranch Wagon I made the mental note to keep Dave’s number as a future contact for Ford related parts.

As I pondered my options on the rusty body brace suddenly, Dave The Edsel Guy‘s name flashed into my mind from the mental Ford Rolodex in my brain! I gave Dave a call, and asked him if he still had the Edsel 4 door. He said “Yes I do. However I’m taking it to the crusher in 3 days because I’ve got everything off of it I want.” I told him my predicament about the rusty floor brace  and he said “Do you have a sawzall? Because you can come out and cut off whatever you need.” I was relieved! I showed up, and Dave and  his wife were preparing the area for me to get to chopping the brace out. Their kindness and hospitality were appreciated. Dave says his wife is as passionate about his old car hobby as he is. Which is neat to see.

So Dave and I unbolt the front seat and pull it out. The seat is a 40/60 split bench seat, which is rare.  I ended up purchasing it from him and plan on using it in the wagon. The springs are in great shape, and the 40/60 split gives those entering the car from passenger  side to get into the  back seat a whole lot more room than a standard 50/50 splint bench seat.

After removing the body bolt I use my sawzall to cut through the rocker panel and into the floor pan up to the tranny tunnel, and back around to the rocker panel and now I have a perfect condition body brace and a cool seat for the Ranch Wagon!


I drilled out the spot welds using a Blair Spot Weld cutter bit, and have the bracket separated and read to be ground down and used when I replace the inner/outer rocker panels later on.  It’s good people like Dave the Edsel guy, who make this hobby enjoyable. By allowing me cut out a part I needed for my car, out of a crusher bound Edsel, Dave has really proven that old car guys look out for each other. Thanks Dave!


I purchased a set of reproduction Ball joints for the Ranch Wagon.  I just couldn’t find NOS lower ball joints at a reasonable price.  So I found the best quality reproductions available.  The rubber grease boots are high quality, which is important to look for in a reproduction ball  joint. Too often the boot ages quickly, dries out and becomes brittle. This leads to it tearing and falling apart. Then the grease won’t stay in the housing, and grit and contaminants can get into it and ruin the ball joint.  The vendors don’t sell the grease boot by itself, so you are usually stuck buying a new ball joint just for the boot.  FRUSTRATING!!!

I have soaked the upper control arms, ground the factory rivets off of the upper ball joints, hammered them out, and will be sand blasting them tomorrow.  I then plan on taking them and a number of other items to the powder coater.  I am cutting it close to self imposed deadline of September 15 to have the front suspension refurbished/replaced and the wheels on the ground, but I think I can make it.